> ## Documentation Index
> Fetch the complete documentation index at: https://docs-dev-chore-events-autoupdate.mintlify.site/llms.txt
> Use this file to discover all available pages before exploring further.
> Configure push notifications as an Auth0 MFA factor with AWS SNS, Firebase Cloud Messaging, or Apple Push Notifications via the Auth0 Guardian SDK.
# Configure Push Notifications for MFA
The [Guardian](/docs/secure/multi-factor-authentication/auth0-guardian) SDKs for [iOS](/docs/secure/multi-factor-authentication/auth0-guardian/guardian-for-ios-sdk) and [Android](/docs/secure/multi-factor-authentication/auth0-guardian/guardian-for-android-sdk) allow you to use a custom-built app for vendor-specific push notification services. You can configure push notifications for the AWS Simple Notification Service (SNS) platform or use Direct to Vendor services to add Firebase Cloud Messaging (FCM) and Apple Push Notification (APN) credentials directly in Auth0.
## AWS SNS Configuration
Before you configure push notifications, follow the prerequisites below:
1. [Create an SNS Platform Application](https://console.aws.amazon.com/sns/v3/home?region=us-east-1#/mobile/push-notifications/platform-applications) using AWS Management console and note it’s ARN.
2. Create an AWS Access Key ID authorized to create Platform Application endpoints. Guardian automatically creates a Platform Application endpoint with an appropriate device token as part of a successful enrollment.
### Configure push notifications with AWS SNS
To receive push notifications from Guardian, you first need to override Guardian's default SNS settings. Then, you can configure push notifications for Android and iOS.
1. On the Auth0 Dashboard, navigate to [Security > Multi-factor Auth](https://manage.auth0.com/#/security/mfa) and select **Push via Auth0 Guardian**. If the method is inactive, select the toggle at the top right to enable it.
2. Select **Custom** to reveal additional settings.
3. In the Push Notification Service section, choose **Amazon SNS.**
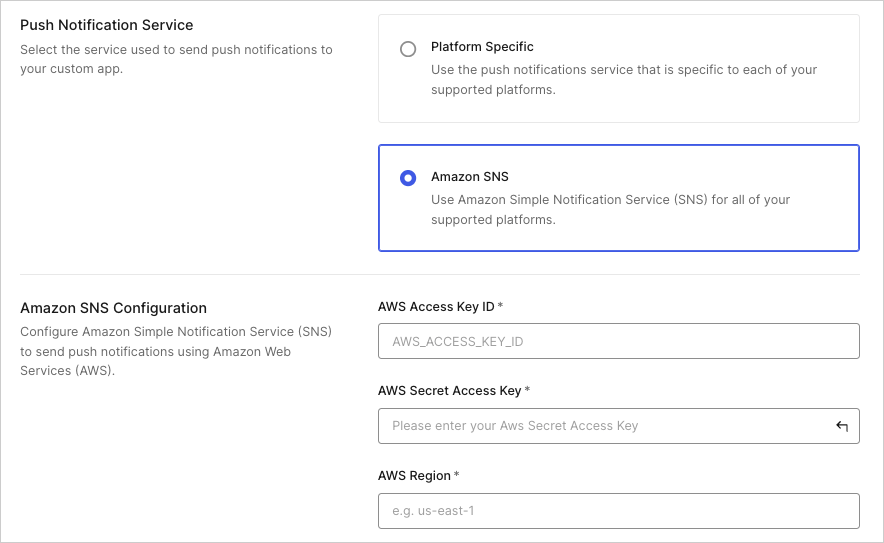 1. In the Amazon SNS Configuration section, complete the following fields:
| Field | Description |
| - | - |
| AWS Access Key ID | Your AWS Access Key ID. |
| AWS Secret Access Key | Your AWS Secret Access Key. |
| AWS Region | Your AWS application's region. |
2. Select **Save** to complete your changes.
## Configure push notifications for Android using FCM
To configure Android push notifications on your Auth0 Dashboard, first retrieve your FCM server credentials. For full details, review Google's [Firebase documentation](https://firebase.google.com/docs/admin/setup#initialize-sdk).
1. Navigate to the Firebase Console and select your applicable project.
2. Open the **Settings** menu and choose **Service Accounts**.
3. Select **Generate New Private Key** to download your credential file.
After you retrieve your credentials, you can configure push notifications on your Auth0 Dashboard.
After retrieving your credentials, you can configure Android push notifications from your Auth0 Dashboard.
1. Navigate to [Security > Multi-factor Auth](https://manage.auth0.com/#/guardian) and select **Push Notification using Auth0 Guardian**.
2. In the Push Notification App section, select **Custom** to reveal additional settings.
3. In the Android App Configuration section, configure the following:
| Setting | Description |
| - | - |
| Enable Android App | Allows Auth0 to send push notifications to your custom application. If this option is not enabled, push notifications cannot be sent. |
| Google Play Store URL | Provide a link to the custom application users must download to configure MFA. |
| FCM Server Credentials | Upload your [FCM server credentials](https://firebase.google.com/docs/admin/setup#initialize-sdk). |
4. Select **Save** to complete your changes.
## Configure push notifications for iOS using APNs
To configure iOS push notifications on your Auth0 Dashboard, first retrieve your APN certificate.
1. Generate a [new APN certificate](https://developer.apple.com/documentation/usernotifications/setting_up_a_remote_notification_server/establishing_a_certificate-based_connection_to_apns#2947597) from your Apple developer account.
2. Install the certificate locally.
3. Find the **Apple Sandbox Push Services: {AppId}** certificate in your Keychain Access.
4. Export the certificate and the associated private key to a P12 file without a password (default name: `Certificates.p12`).
5. To generate a P12 file using Triple DES instead of RC2, run
```bash lines theme={null}
openssl pkcs12 -in Certificates.p12 -legacy -nocerts -nodes -out pk.pem -passin pass:"" &&
openssl pkcs12 -in Certificates.p12 -legacy -nokeys -out cert.crt -passin pass:"" &&
openssl pkcs12 -export -inkey pk.pem -in cert.crt -descert -out Certificate_3des.p12 -passout pass:"" &&
rm pk.pem cert.crt
```
6. Delete `Certificates.p12` and use `Certificate_3des.p12` as the APN certificate in the Auth0 Dashboard.
After you retrieve your credentials, you can configure push notifications on your Auth0 Dashboard.
After retrieving your credentials, you can configure iOS push notifications from your Auth0 Dashboard.
1. Navigate to [Security > Multi-factor Auth](https://manage.auth0.com/#/guardian) and select **Push Notification using Auth0 Guardian**.
2. In the Push Notification App section, select **Custom** to reveal additional settings.
3. In the iOS App Configuration section, configure the following:
| Field | Description |
| - | - |
| Enable iOS App | Allows Auth0 to send push notifications to your custom application. If this option is not enabled, push notifications cannot be sent. |
| Apple App Store URL | Provide a link to the custom application users must download to configure MFA. |
| APNs Bundle ID | Provided by iOS Developer Console. |
| APNs Certificate | Upload your [P12 certificate](https://developer.apple.com/documentation/usernotifications/setting_up_a_remote_notification_server/establishing_a_certificate-based_connection_to_apns). |
| iOS App Environment | Set this based on the configuration within your Apple developer account. |
4. Select **Save** to complete your changes.
## Learn more
* [Auth0 Guardian](/docs/secure/multi-factor-authentication/auth0-guardian)
* [Guardian for Android SDK](/docs/secure/multi-factor-authentication/auth0-guardian/guardian-for-android-sdk)
* [Guardian.swift iOS SDK](/docs/secure/multi-factor-authentication/auth0-guardian/guardian-for-ios-sdk)
* [Create Custom Enrollment Tickets](/docs/secure/multi-factor-authentication/multi-factor-authentication-developer-resources/create-custom-enrollment-tickets)
* [Enroll and Challenge Push Authenticators](/docs/secure/multi-factor-authentication/authenticate-using-ropg-flow-with-mfa/enroll-and-challenge-push-authenticators)
1. In the Amazon SNS Configuration section, complete the following fields:
| Field | Description |
| - | - |
| AWS Access Key ID | Your AWS Access Key ID. |
| AWS Secret Access Key | Your AWS Secret Access Key. |
| AWS Region | Your AWS application's region. |
2. Select **Save** to complete your changes.
## Configure push notifications for Android using FCM
To configure Android push notifications on your Auth0 Dashboard, first retrieve your FCM server credentials. For full details, review Google's [Firebase documentation](https://firebase.google.com/docs/admin/setup#initialize-sdk).
1. Navigate to the Firebase Console and select your applicable project.
2. Open the **Settings** menu and choose **Service Accounts**.
3. Select **Generate New Private Key** to download your credential file.
After you retrieve your credentials, you can configure push notifications on your Auth0 Dashboard.
After retrieving your credentials, you can configure Android push notifications from your Auth0 Dashboard.
1. Navigate to [Security > Multi-factor Auth](https://manage.auth0.com/#/guardian) and select **Push Notification using Auth0 Guardian**.
2. In the Push Notification App section, select **Custom** to reveal additional settings.
3. In the Android App Configuration section, configure the following:
| Setting | Description |
| - | - |
| Enable Android App | Allows Auth0 to send push notifications to your custom application. If this option is not enabled, push notifications cannot be sent. |
| Google Play Store URL | Provide a link to the custom application users must download to configure MFA. |
| FCM Server Credentials | Upload your [FCM server credentials](https://firebase.google.com/docs/admin/setup#initialize-sdk). |
4. Select **Save** to complete your changes.
## Configure push notifications for iOS using APNs
To configure iOS push notifications on your Auth0 Dashboard, first retrieve your APN certificate.
1. Generate a [new APN certificate](https://developer.apple.com/documentation/usernotifications/setting_up_a_remote_notification_server/establishing_a_certificate-based_connection_to_apns#2947597) from your Apple developer account.
2. Install the certificate locally.
3. Find the **Apple Sandbox Push Services: {AppId}** certificate in your Keychain Access.
4. Export the certificate and the associated private key to a P12 file without a password (default name: `Certificates.p12`).
5. To generate a P12 file using Triple DES instead of RC2, run
```bash lines theme={null}
openssl pkcs12 -in Certificates.p12 -legacy -nocerts -nodes -out pk.pem -passin pass:"" &&
openssl pkcs12 -in Certificates.p12 -legacy -nokeys -out cert.crt -passin pass:"" &&
openssl pkcs12 -export -inkey pk.pem -in cert.crt -descert -out Certificate_3des.p12 -passout pass:"" &&
rm pk.pem cert.crt
```
6. Delete `Certificates.p12` and use `Certificate_3des.p12` as the APN certificate in the Auth0 Dashboard.
After you retrieve your credentials, you can configure push notifications on your Auth0 Dashboard.
After retrieving your credentials, you can configure iOS push notifications from your Auth0 Dashboard.
1. Navigate to [Security > Multi-factor Auth](https://manage.auth0.com/#/guardian) and select **Push Notification using Auth0 Guardian**.
2. In the Push Notification App section, select **Custom** to reveal additional settings.
3. In the iOS App Configuration section, configure the following:
| Field | Description |
| - | - |
| Enable iOS App | Allows Auth0 to send push notifications to your custom application. If this option is not enabled, push notifications cannot be sent. |
| Apple App Store URL | Provide a link to the custom application users must download to configure MFA. |
| APNs Bundle ID | Provided by iOS Developer Console. |
| APNs Certificate | Upload your [P12 certificate](https://developer.apple.com/documentation/usernotifications/setting_up_a_remote_notification_server/establishing_a_certificate-based_connection_to_apns). |
| iOS App Environment | Set this based on the configuration within your Apple developer account. |
4. Select **Save** to complete your changes.
## Learn more
* [Auth0 Guardian](/docs/secure/multi-factor-authentication/auth0-guardian)
* [Guardian for Android SDK](/docs/secure/multi-factor-authentication/auth0-guardian/guardian-for-android-sdk)
* [Guardian.swift iOS SDK](/docs/secure/multi-factor-authentication/auth0-guardian/guardian-for-ios-sdk)
* [Create Custom Enrollment Tickets](/docs/secure/multi-factor-authentication/multi-factor-authentication-developer-resources/create-custom-enrollment-tickets)
* [Enroll and Challenge Push Authenticators](/docs/secure/multi-factor-authentication/authenticate-using-ropg-flow-with-mfa/enroll-and-challenge-push-authenticators)