> ## Documentation Index
> Fetch the complete documentation index at: https://docs-dev-chore-events-autoupdate.mintlify.site/llms.txt
> Use this file to discover all available pages before exploring further.

> Découvrez comment configurer des étapes d’inscription supplémentaires à l’aide de Forms for Actions

# Cas d’utilisation : Configurer des étapes d’inscription supplémentaires à l’aide de Forms

<Card title="Avant de commencer">
  1. Créez une [Machine-to-Machine Application](/docs/fr-ca/get-started/auth0-overview/create-applications/machine-to-machine-apps) avec les scopes suivants activés :

  * `read:users`
  * `update:users`
  * `create:users`
  * `read:users_app_metadata`
  * `update:users_app_metadata`
  * `create:users_app_metadata`

  2. Ajoutez une [connexion Vault](/docs/fr-ca/customize/forms/vault) à l’aide des informations d’identification de l’application M2M.
</Card>

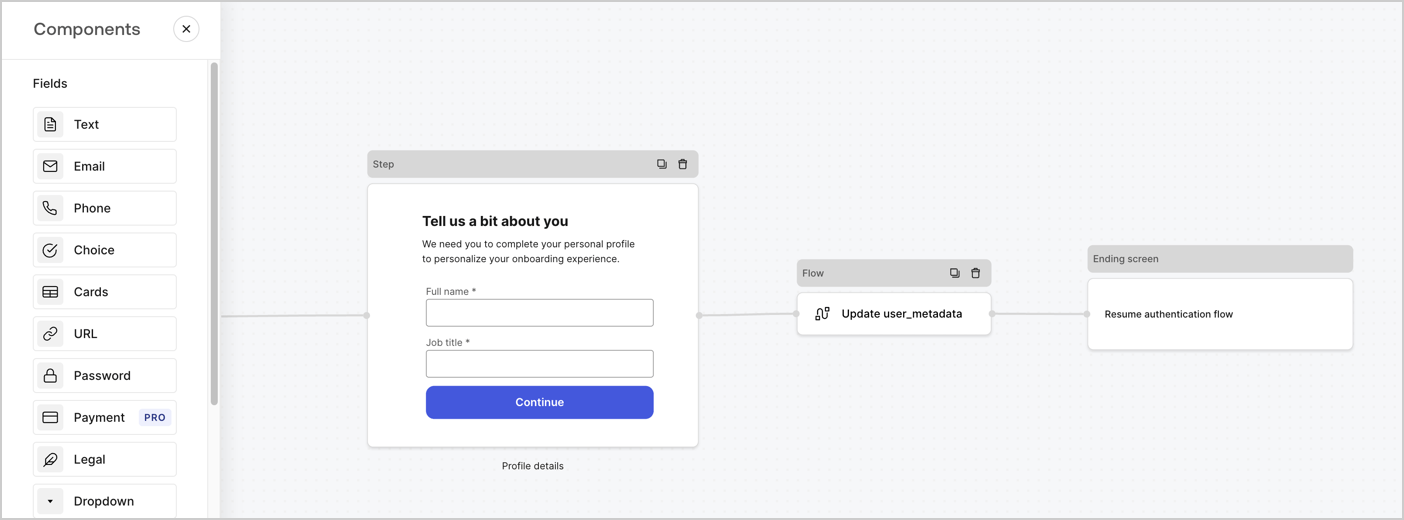
Forms for Actions vous permet d’ajouter des étapes supplémentaires à vos flux d’inscription ou de login, et de les rendre obligatoires avant que les utilisateurs puissent accéder à votre application.
<Frame>
  <img src="https://mintcdn.com/docs-dev-chore-events-autoupdate/yZguHZo4mYCarnn9/docs/images/cdy7uua7fh8z/ZOQNi6SrEC9OREcBbdiJ3/d79f84fb61acd5473bdf932527e26d58/custom-signup-form.png?fit=max&auto=format&n=yZguHZo4mYCarnn9&q=85&s=52a0fcc0579746e6179faa4679444f49" alt="Dashboard > Actions > Forms > Cas d’utilisation Formulaire d’inscription personnalisé" data-og-width="1404" width="1404" data-og-height="520" height="520" data-path="docs/images/cdy7uua7fh8z/ZOQNi6SrEC9OREcBbdiJ3/d79f84fb61acd5473bdf932527e26d58/custom-signup-form.png" data-optimize="true" data-opv="3" srcset="https://mintcdn.com/docs-dev-chore-events-autoupdate/yZguHZo4mYCarnn9/docs/images/cdy7uua7fh8z/ZOQNi6SrEC9OREcBbdiJ3/d79f84fb61acd5473bdf932527e26d58/custom-signup-form.png?w=280&fit=max&auto=format&n=yZguHZo4mYCarnn9&q=85&s=de007f2d1d9f7c5ca991b9a6de160282 280w, https://mintcdn.com/docs-dev-chore-events-autoupdate/yZguHZo4mYCarnn9/docs/images/cdy7uua7fh8z/ZOQNi6SrEC9OREcBbdiJ3/d79f84fb61acd5473bdf932527e26d58/custom-signup-form.png?w=560&fit=max&auto=format&n=yZguHZo4mYCarnn9&q=85&s=d3c8f2862fe617b3479f475a780a928d 560w, https://mintcdn.com/docs-dev-chore-events-autoupdate/yZguHZo4mYCarnn9/docs/images/cdy7uua7fh8z/ZOQNi6SrEC9OREcBbdiJ3/d79f84fb61acd5473bdf932527e26d58/custom-signup-form.png?w=840&fit=max&auto=format&n=yZguHZo4mYCarnn9&q=85&s=bca7314f206830153cc1ca529e49de77 840w, https://mintcdn.com/docs-dev-chore-events-autoupdate/yZguHZo4mYCarnn9/docs/images/cdy7uua7fh8z/ZOQNi6SrEC9OREcBbdiJ3/d79f84fb61acd5473bdf932527e26d58/custom-signup-form.png?w=1100&fit=max&auto=format&n=yZguHZo4mYCarnn9&q=85&s=ebdf3842593dfdedf1e540b06aed75e3 1100w, https://mintcdn.com/docs-dev-chore-events-autoupdate/yZguHZo4mYCarnn9/docs/images/cdy7uua7fh8z/ZOQNi6SrEC9OREcBbdiJ3/d79f84fb61acd5473bdf932527e26d58/custom-signup-form.png?w=1650&fit=max&auto=format&n=yZguHZo4mYCarnn9&q=85&s=94b28524544fe3017b95e48514d3ef2b 1650w, https://mintcdn.com/docs-dev-chore-events-autoupdate/yZguHZo4mYCarnn9/docs/images/cdy7uua7fh8z/ZOQNi6SrEC9OREcBbdiJ3/d79f84fb61acd5473bdf932527e26d58/custom-signup-form.png?w=2500&fit=max&auto=format&n=yZguHZo4mYCarnn9&q=85&s=e6c62b978a8e653897deaf16ce6b1d13 2500w" />
</Frame>

Les sections ci-dessous expliquent comment créer des formulaires pour ajouter des étapes d’inscription supplémentaires à l’aide de nœuds et de flux, ainsi que la marche à suivre pour ajouter votre formulaire à une Action [Post Login](/docs/fr-ca/customize/actions/explore-triggers/signup-and-login-triggers/login-trigger).

<h2 id="create-a-form-from-scratch">
  Créer un formulaire à partir de zéro
</h2>

Suivez ces étapes pour créer un formulaire afin de recueillir des renseignements :

1. Ouvrez l’éditeur de formulaires en sélectionnant **Auth0 Dashboard > Actions > Forms.**
2. Sélectionnez **Create Form** > **Start from scratch**.

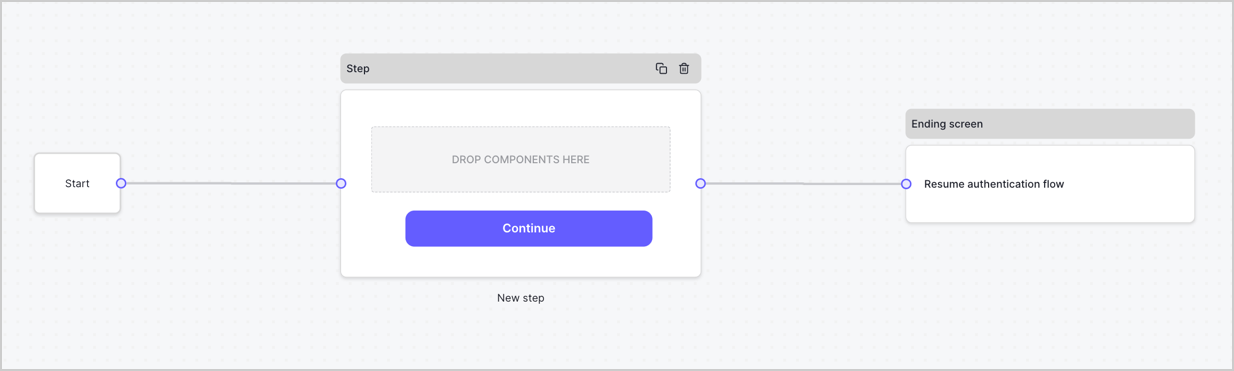
Par défaut, un nouveau formulaire contient un nœud Start, un nœud Step et un nœud Ending screen.
<Frame>
  <img src="https://mintcdn.com/docs-dev-chore-events-autoupdate/C-wLBWI5GtiUYTuO/docs/images/cdy7uua7fh8z/2TZ9jSjgEcARFpULI6hz4R/a4319a1bd482f2ee5cc23100fdb2f42c/New-form-Forms-for-action-use-case.png?fit=max&auto=format&n=C-wLBWI5GtiUYTuO&q=85&s=7d165a121e5a9bfef38c82b09a03f921" alt="Dashboard > Forms > Cas d’utilisation > Form" data-og-width="1234" width="1234" data-og-height="371" height="371" data-path="docs/images/cdy7uua7fh8z/2TZ9jSjgEcARFpULI6hz4R/a4319a1bd482f2ee5cc23100fdb2f42c/New-form-Forms-for-action-use-case.png" data-optimize="true" data-opv="3" srcset="https://mintcdn.com/docs-dev-chore-events-autoupdate/C-wLBWI5GtiUYTuO/docs/images/cdy7uua7fh8z/2TZ9jSjgEcARFpULI6hz4R/a4319a1bd482f2ee5cc23100fdb2f42c/New-form-Forms-for-action-use-case.png?w=280&fit=max&auto=format&n=C-wLBWI5GtiUYTuO&q=85&s=ad76673528e9cc61b95ce95756131035 280w, https://mintcdn.com/docs-dev-chore-events-autoupdate/C-wLBWI5GtiUYTuO/docs/images/cdy7uua7fh8z/2TZ9jSjgEcARFpULI6hz4R/a4319a1bd482f2ee5cc23100fdb2f42c/New-form-Forms-for-action-use-case.png?w=560&fit=max&auto=format&n=C-wLBWI5GtiUYTuO&q=85&s=f7eea182328fc615bd0b043c52919a7d 560w, https://mintcdn.com/docs-dev-chore-events-autoupdate/C-wLBWI5GtiUYTuO/docs/images/cdy7uua7fh8z/2TZ9jSjgEcARFpULI6hz4R/a4319a1bd482f2ee5cc23100fdb2f42c/New-form-Forms-for-action-use-case.png?w=840&fit=max&auto=format&n=C-wLBWI5GtiUYTuO&q=85&s=947f0c433c27a08a8aac370a9872922e 840w, https://mintcdn.com/docs-dev-chore-events-autoupdate/C-wLBWI5GtiUYTuO/docs/images/cdy7uua7fh8z/2TZ9jSjgEcARFpULI6hz4R/a4319a1bd482f2ee5cc23100fdb2f42c/New-form-Forms-for-action-use-case.png?w=1100&fit=max&auto=format&n=C-wLBWI5GtiUYTuO&q=85&s=310cdf70cc88507bcbb9b7ac23ea226a 1100w, https://mintcdn.com/docs-dev-chore-events-autoupdate/C-wLBWI5GtiUYTuO/docs/images/cdy7uua7fh8z/2TZ9jSjgEcARFpULI6hz4R/a4319a1bd482f2ee5cc23100fdb2f42c/New-form-Forms-for-action-use-case.png?w=1650&fit=max&auto=format&n=C-wLBWI5GtiUYTuO&q=85&s=43f4c5631e2b1e1b267bdfcaa40d6fc0 1650w, https://mintcdn.com/docs-dev-chore-events-autoupdate/C-wLBWI5GtiUYTuO/docs/images/cdy7uua7fh8z/2TZ9jSjgEcARFpULI6hz4R/a4319a1bd482f2ee5cc23100fdb2f42c/New-form-Forms-for-action-use-case.png?w=2500&fit=max&auto=format&n=C-wLBWI5GtiUYTuO&q=85&s=94f2d7c60e4678ccd548eb1527a2c887 2500w" />
</Frame>

<h3 id="configure-the-step-node">
  Configurer le nœud Step
</h3>

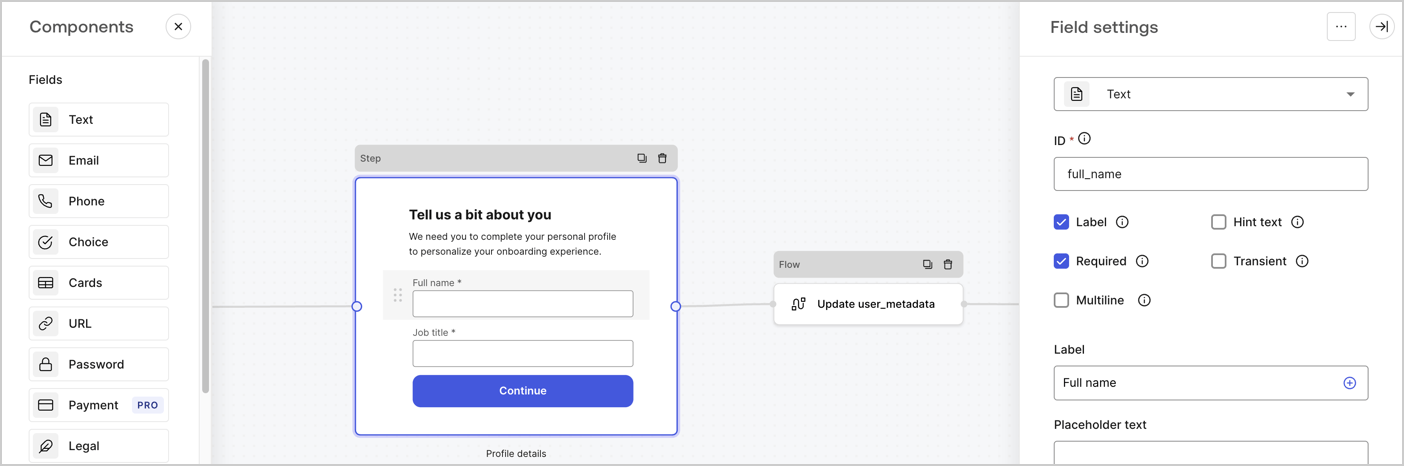
Le nœud Step est l’interface graphique visible par les utilisateurs. Ajoutez des [champs](/docs/fr-ca/customize/forms/nodes-and-components) au nœud Step pour recueillir le nom complet et le titre du poste de l’utilisateur en suivant ces étapes :

1. Faites glisser un champ **Texte enrichi** du **menu Components** vers le nœud **Step**.

   * **Texte enrichi** : Saisissez un message personnalisé.
   * Sélectionnez **Enregistrer**.
2. Faites glisser un champ **Texte** vers le nœud **Step**.

   * **ID** : Saisissez `full_name`.
   * **Étiquette** : Saisissez `Full name`.
   * **Étiquette** : Cochez la case.
   * **Obligatoire** : Cochez la case.
   * Sélectionnez **Enregistrer**.
3. Faites glisser un champ **Texte** vers le nœud **Step**.

   * **ID** : Saisissez `job_title`.
   * **Étiquette** : Saisissez `Job title.`
   * **Étiquette** : Cochez la case.
   * **Obligatoire** : Cochez la case.
   * Sélectionnez **Enregistrer**.
4. Sélectionnez **Publier** pour enregistrer.
<Frame>
  <img src="https://mintcdn.com/docs-dev-chore-events-autoupdate/JrqAYUIkepsXuxEr/docs/images/cdy7uua7fh8z/6Kcn0ai9fsVsqHwZpTGByG/37cbf4ffee63a7010926b15f06dd20ac/custom-signup-step-node.png?fit=max&auto=format&n=JrqAYUIkepsXuxEr&q=85&s=2b6cc80a9794a163c388b88b60442348" alt="Dashboard > Actions > Forms > cas d’utilisation Custom Signup étapes nœud Step" data-og-width="1404" width="1404" data-og-height="466" height="466" data-path="docs/images/cdy7uua7fh8z/6Kcn0ai9fsVsqHwZpTGByG/37cbf4ffee63a7010926b15f06dd20ac/custom-signup-step-node.png" data-optimize="true" data-opv="3" srcset="https://mintcdn.com/docs-dev-chore-events-autoupdate/JrqAYUIkepsXuxEr/docs/images/cdy7uua7fh8z/6Kcn0ai9fsVsqHwZpTGByG/37cbf4ffee63a7010926b15f06dd20ac/custom-signup-step-node.png?w=280&fit=max&auto=format&n=JrqAYUIkepsXuxEr&q=85&s=78e9a2c897b130d333ed454364b09014 280w, https://mintcdn.com/docs-dev-chore-events-autoupdate/JrqAYUIkepsXuxEr/docs/images/cdy7uua7fh8z/6Kcn0ai9fsVsqHwZpTGByG/37cbf4ffee63a7010926b15f06dd20ac/custom-signup-step-node.png?w=560&fit=max&auto=format&n=JrqAYUIkepsXuxEr&q=85&s=7b47d2b0822d18619167ca87f333ef9b 560w, https://mintcdn.com/docs-dev-chore-events-autoupdate/JrqAYUIkepsXuxEr/docs/images/cdy7uua7fh8z/6Kcn0ai9fsVsqHwZpTGByG/37cbf4ffee63a7010926b15f06dd20ac/custom-signup-step-node.png?w=840&fit=max&auto=format&n=JrqAYUIkepsXuxEr&q=85&s=7609a071adb57b1808b219b0987e8d07 840w, https://mintcdn.com/docs-dev-chore-events-autoupdate/JrqAYUIkepsXuxEr/docs/images/cdy7uua7fh8z/6Kcn0ai9fsVsqHwZpTGByG/37cbf4ffee63a7010926b15f06dd20ac/custom-signup-step-node.png?w=1100&fit=max&auto=format&n=JrqAYUIkepsXuxEr&q=85&s=c8c0cb3272f6a698e05a338044c0e68c 1100w, https://mintcdn.com/docs-dev-chore-events-autoupdate/JrqAYUIkepsXuxEr/docs/images/cdy7uua7fh8z/6Kcn0ai9fsVsqHwZpTGByG/37cbf4ffee63a7010926b15f06dd20ac/custom-signup-step-node.png?w=1650&fit=max&auto=format&n=JrqAYUIkepsXuxEr&q=85&s=fc9f4760b622abba605f21683b2f5338 1650w, https://mintcdn.com/docs-dev-chore-events-autoupdate/JrqAYUIkepsXuxEr/docs/images/cdy7uua7fh8z/6Kcn0ai9fsVsqHwZpTGByG/37cbf4ffee63a7010926b15f06dd20ac/custom-signup-step-node.png?w=2500&fit=max&auto=format&n=JrqAYUIkepsXuxEr&q=85&s=52e198fa1f3459b3f5df0d8988ccb21d 2500w" />
</Frame>

<h3 id="configure-the-flow-node">
  Configurer le nœud Flow
</h3>

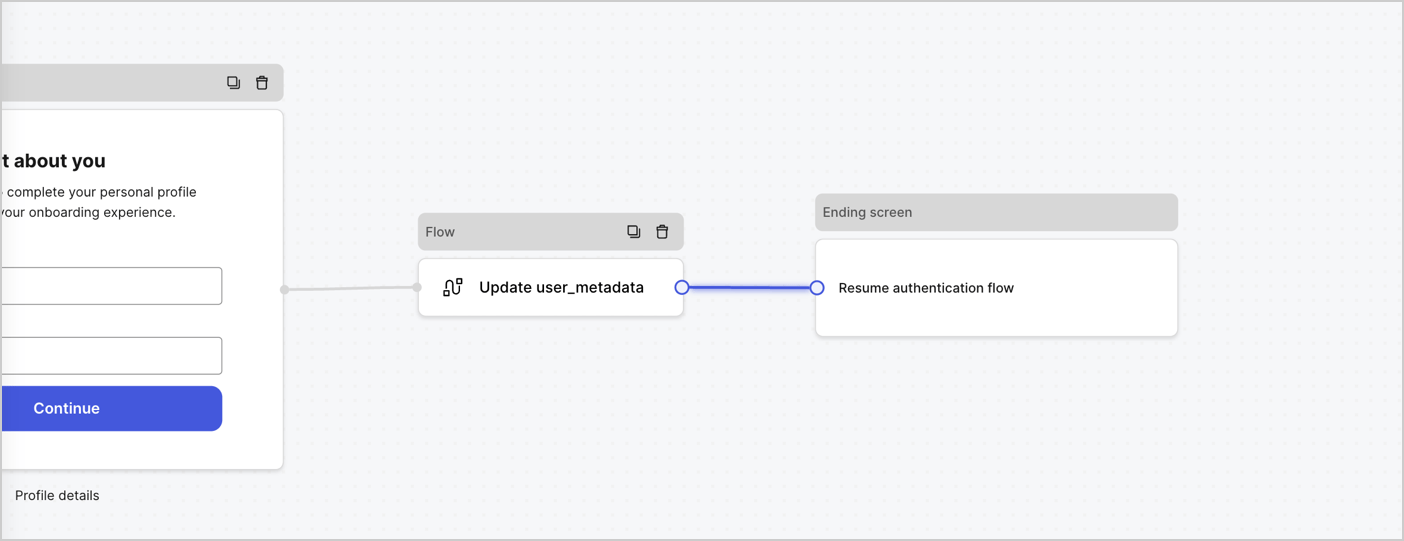
Ajoutez un nœud **Flow** après le nœud **Step** pour mettre à jour `user_metadata` et reprendre le flux d’authentification en suivant ces étapes :

1. Sélectionnez **Flow** au bas de l’éditeur de formulaires.
2. Supprimez le lien existant entre les nœuds **Step** et **Ending Screen**.
3. Sélectionnez le nouveau **Flow** > **Click to add a flow** > **Create a new flow.**

   * Entrez `Update user_metadata` dans le champ **Name**.
   * Sélectionnez **Create**.
   * Sélectionnez **Save**.
4. Liez le nœud **Flow** aux nœuds **Step** et **Ending Screen**, comme illustré ci-dessous.
5. Sélectionnez **Publish** pour enregistrer.
<Frame>
  <img src="https://mintcdn.com/docs-dev-chore-events-autoupdate/zUYE0uCEntUxkkyV/docs/images/cdy7uua7fh8z/4nTdYdA2Hu5vK65smkdvJg/db3294ebc25a7c2636be96362a3ea56e/custom-signup-step-flow.png?fit=max&auto=format&n=zUYE0uCEntUxkkyV&q=85&s=0e1239c581a1688049b2c4984581a266" alt="Dashboard > Actions > Forms > Cas d’usage Custom Signup Step Update User metadata flow" data-og-width="1404" width="1404" data-og-height="541" height="541" data-path="docs/images/cdy7uua7fh8z/4nTdYdA2Hu5vK65smkdvJg/db3294ebc25a7c2636be96362a3ea56e/custom-signup-step-flow.png" data-optimize="true" data-opv="3" srcset="https://mintcdn.com/docs-dev-chore-events-autoupdate/zUYE0uCEntUxkkyV/docs/images/cdy7uua7fh8z/4nTdYdA2Hu5vK65smkdvJg/db3294ebc25a7c2636be96362a3ea56e/custom-signup-step-flow.png?w=280&fit=max&auto=format&n=zUYE0uCEntUxkkyV&q=85&s=2ee0a2e66344308d1f9ede0d13b61297 280w, https://mintcdn.com/docs-dev-chore-events-autoupdate/zUYE0uCEntUxkkyV/docs/images/cdy7uua7fh8z/4nTdYdA2Hu5vK65smkdvJg/db3294ebc25a7c2636be96362a3ea56e/custom-signup-step-flow.png?w=560&fit=max&auto=format&n=zUYE0uCEntUxkkyV&q=85&s=1acb1351c3dadf3a19e8ea5a658975bc 560w, https://mintcdn.com/docs-dev-chore-events-autoupdate/zUYE0uCEntUxkkyV/docs/images/cdy7uua7fh8z/4nTdYdA2Hu5vK65smkdvJg/db3294ebc25a7c2636be96362a3ea56e/custom-signup-step-flow.png?w=840&fit=max&auto=format&n=zUYE0uCEntUxkkyV&q=85&s=c29162efcd232f17220d0e03df43e9aa 840w, https://mintcdn.com/docs-dev-chore-events-autoupdate/zUYE0uCEntUxkkyV/docs/images/cdy7uua7fh8z/4nTdYdA2Hu5vK65smkdvJg/db3294ebc25a7c2636be96362a3ea56e/custom-signup-step-flow.png?w=1100&fit=max&auto=format&n=zUYE0uCEntUxkkyV&q=85&s=605fdbd804c2519750eafc7b87492408 1100w, https://mintcdn.com/docs-dev-chore-events-autoupdate/zUYE0uCEntUxkkyV/docs/images/cdy7uua7fh8z/4nTdYdA2Hu5vK65smkdvJg/db3294ebc25a7c2636be96362a3ea56e/custom-signup-step-flow.png?w=1650&fit=max&auto=format&n=zUYE0uCEntUxkkyV&q=85&s=9a0186544baf500c9d1fe8aefdafacda 1650w, https://mintcdn.com/docs-dev-chore-events-autoupdate/zUYE0uCEntUxkkyV/docs/images/cdy7uua7fh8z/4nTdYdA2Hu5vK65smkdvJg/db3294ebc25a7c2636be96362a3ea56e/custom-signup-step-flow.png?w=2500&fit=max&auto=format&n=zUYE0uCEntUxkkyV&q=85&s=e449a859d92aabd152c6e6657074ec6d 2500w" />
</Frame>

Ajoutez une action Auth0 **Update user** au flux en suivant ces étapes :

1. Sélectionnez le **Flow** **Update user\_metadata** > **Edit flow** pour ouvrir l’éditeur de flux dans un nouvel onglet.
2. Sous StartAction, sélectionnez l’icône **+** pour ajouter une Action **Update user**. Remplissez les champs ci-dessous, puis sélectionnez **Save** pour continuer.

   * **Connection** : Dans la liste déroulante, sélectionnez la connexion Vault vers votre application M2M.

   * **User ID** : Entrez `{{context.user.user_id}}`.

   * **Body** : Copiez-collez le code suivant pour mettre à jour `user_metadata` avec les propriétés `full_name` et `job_title`.

     ```json lines theme={null}
     {
       "user_metadata": {
         "full_name": "{{fields.full_name}}",
         "job_title": "{{fields.job_title}}"
       }
     }
     ```

   * Sélectionnez **Save**.
3. Sélectionnez Publish pour enregistrer.

<h2 id="retrieve-your-form-render-code">
  Récupérez le code de rendu de votre formulaire
</h2>

Récupérez le code de rendu de votre formulaire pour afficher le formulaire visuellement à l’aide d’une Action Post Login personnalisée en suivant ces étapes :

* Dans l’éditeur de formulaires, sélectionnez **`<> Render`**.
* Sélectionnez **Copy**.
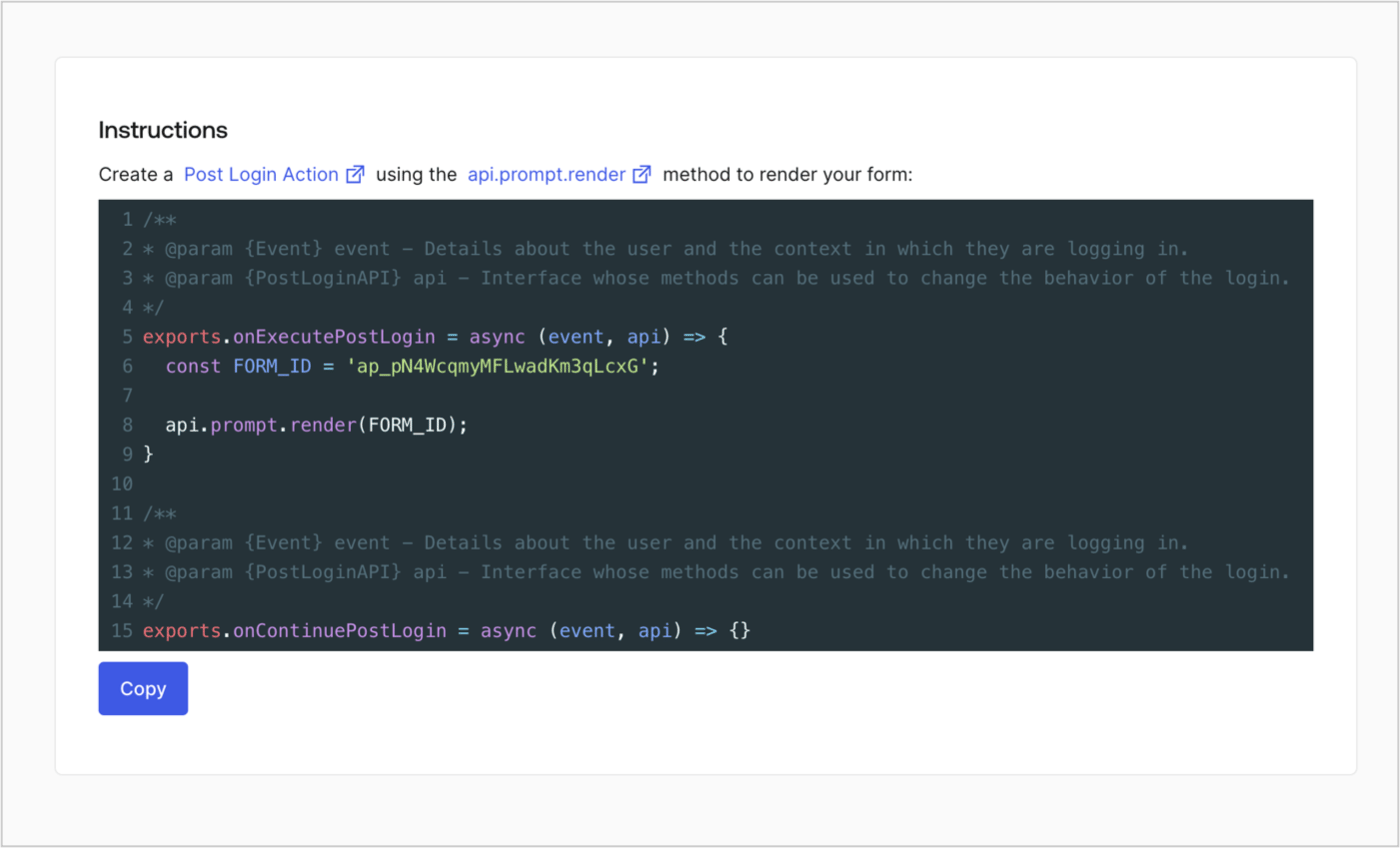
<Frame>
  <img src="https://mintcdn.com/docs-dev-chore-events-autoupdate/MOUmiRXu5I_3fPz2/docs/images/cdy7uua7fh8z/2EIUzc539sq9lwoTKbjoJv/496a864c0fc44a782c9cadca119dbfb0/embed.png?fit=max&auto=format&n=MOUmiRXu5I_3fPz2&q=85&s=7082c216911bba97387c766dfa39984d" alt="Dashboard > Actions > Forms > Form > Embed" data-og-width="1400" width="1400" data-og-height="848" height="848" data-path="docs/images/cdy7uua7fh8z/2EIUzc539sq9lwoTKbjoJv/496a864c0fc44a782c9cadca119dbfb0/embed.png" data-optimize="true" data-opv="3" srcset="https://mintcdn.com/docs-dev-chore-events-autoupdate/MOUmiRXu5I_3fPz2/docs/images/cdy7uua7fh8z/2EIUzc539sq9lwoTKbjoJv/496a864c0fc44a782c9cadca119dbfb0/embed.png?w=280&fit=max&auto=format&n=MOUmiRXu5I_3fPz2&q=85&s=e241f8c0ff5c2f4e2ce710bf0fb8ab2a 280w, https://mintcdn.com/docs-dev-chore-events-autoupdate/MOUmiRXu5I_3fPz2/docs/images/cdy7uua7fh8z/2EIUzc539sq9lwoTKbjoJv/496a864c0fc44a782c9cadca119dbfb0/embed.png?w=560&fit=max&auto=format&n=MOUmiRXu5I_3fPz2&q=85&s=e00a706e32c07b59485a8650fcc69c3b 560w, https://mintcdn.com/docs-dev-chore-events-autoupdate/MOUmiRXu5I_3fPz2/docs/images/cdy7uua7fh8z/2EIUzc539sq9lwoTKbjoJv/496a864c0fc44a782c9cadca119dbfb0/embed.png?w=840&fit=max&auto=format&n=MOUmiRXu5I_3fPz2&q=85&s=b3f2b101429be35fb987a4e40f23a2fc 840w, https://mintcdn.com/docs-dev-chore-events-autoupdate/MOUmiRXu5I_3fPz2/docs/images/cdy7uua7fh8z/2EIUzc539sq9lwoTKbjoJv/496a864c0fc44a782c9cadca119dbfb0/embed.png?w=1100&fit=max&auto=format&n=MOUmiRXu5I_3fPz2&q=85&s=50c0682479503c1f8d496764975ddf5e 1100w, https://mintcdn.com/docs-dev-chore-events-autoupdate/MOUmiRXu5I_3fPz2/docs/images/cdy7uua7fh8z/2EIUzc539sq9lwoTKbjoJv/496a864c0fc44a782c9cadca119dbfb0/embed.png?w=1650&fit=max&auto=format&n=MOUmiRXu5I_3fPz2&q=85&s=c895cb40bf7e41e983c73118d6d76350 1650w, https://mintcdn.com/docs-dev-chore-events-autoupdate/MOUmiRXu5I_3fPz2/docs/images/cdy7uua7fh8z/2EIUzc539sq9lwoTKbjoJv/496a864c0fc44a782c9cadca119dbfb0/embed.png?w=2500&fit=max&auto=format&n=MOUmiRXu5I_3fPz2&q=85&s=f93e3cb915eae1cc79a84bd74d622803 2500w" />
</Frame>

<h2 id="create-a-post-login-action">
  Créer une Action Post Login
</h2>

Créez une Action post-login pour afficher votre formulaire en suivant ces étapes :

1. Accédez à **Auth0 Dashboard > Actions > Flows > Login.**
2. Sélectionnez l’icône **+**, puis **Build from scratch** :

   * **Name** : Entrez `Render Additional Signup Form`.
   * **Trigger** : Sélectionnez `Login / Post Login`.
   * **Runtime** : Sélectionnez la version recommandée.
3. Sélectionnez **Create**.

Pour configurer l’Action post-login :

1. Supprimez le code existant dans l’éditeur de code.
2. Collez le code de rendu du formulaire dans l’éditeur de code.
3. Modifiez le code pour définir la logique conditionnelle qui affichera le formulaire.

   ```javascript lines theme={null}
   /**
   * @param {Event} event - Détails sur l’utilisateur et le contexte dans lequel il se connecte.
   * @param {PostLoginAPI} api - Interface dont les méthodes peuvent être utilisées pour modifier le comportement du processus de connexion.
   */
   exports.onExecutePostLogin = async (event, api) => {
     const FORM_ID = 'REPLACE_WITH_YOUR_FORM_ID';

     if (
       !event.user.user_metadata.full_name &&
       !event.user.user_metadata.job_title
     ) {
       api.prompt.render(FORM_ID);
     }
   }

   exports.onContinuePostLogin = async (event, api) => { }
   ```

   <Callout icon="file-lines" color="#0EA5E9" iconType="regular">
     L’exemple de code ci-dessus affichera le formulaire si les propriétés `full_name` et `job_title` sont absentes des métadonnées utilisateur.
   </Callout>
4. Sélectionnez **Deploy.**
5. Glissez-déposez l’Action **Render Additional Signup Form** dans le flux **Login**.
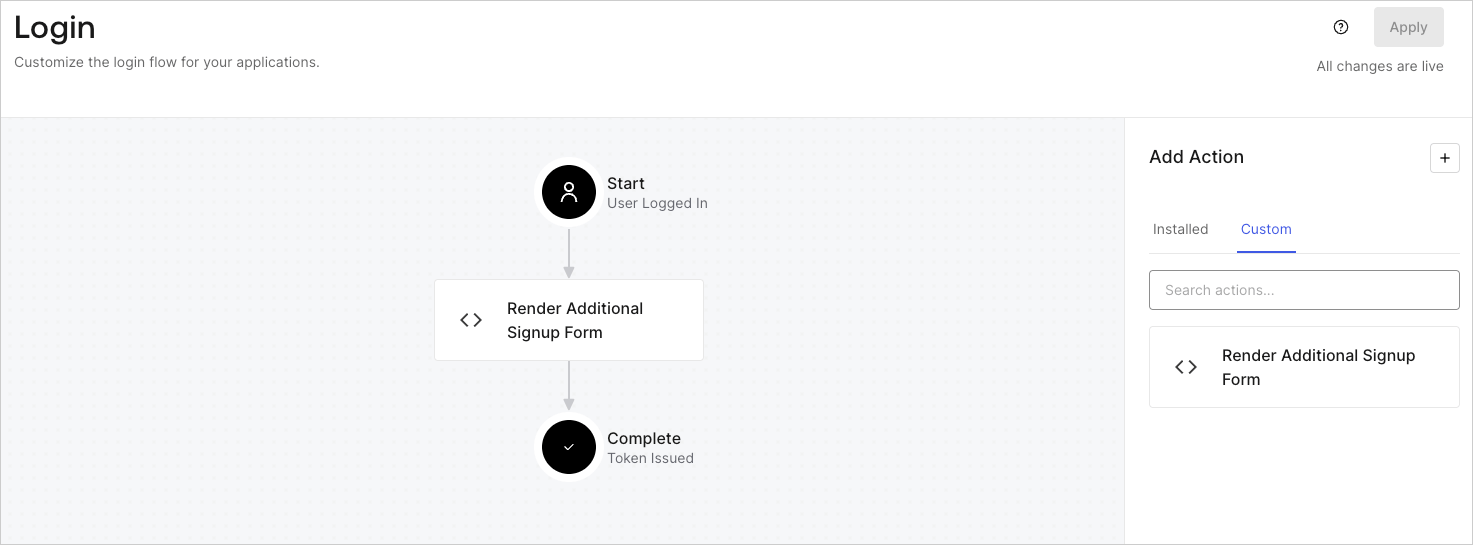
   <Frame>
     <img src="https://mintcdn.com/docs-dev-chore-events-autoupdate/TCxBOmYcNUwWTUFd/docs/images/cdy7uua7fh8z/1WBOicIOcH98hKj6Lq9HF2/4951e30a0cc08c7c5daa0116eaa17e11/Screenshot_2024-03-01_at_15.48.00.png?fit=max&auto=format&n=TCxBOmYcNUwWTUFd&q=85&s=547a1007ccb661db42e5a2a78cfbbca6" alt="Dashboard > Forms > Use Cases Custom Signup Steps Login Flow" data-og-width="1473" width="1473" data-og-height="545" height="545" data-path="docs/images/cdy7uua7fh8z/1WBOicIOcH98hKj6Lq9HF2/4951e30a0cc08c7c5daa0116eaa17e11/Screenshot_2024-03-01_at_15.48.00.png" data-optimize="true" data-opv="3" srcset="https://mintcdn.com/docs-dev-chore-events-autoupdate/TCxBOmYcNUwWTUFd/docs/images/cdy7uua7fh8z/1WBOicIOcH98hKj6Lq9HF2/4951e30a0cc08c7c5daa0116eaa17e11/Screenshot_2024-03-01_at_15.48.00.png?w=280&fit=max&auto=format&n=TCxBOmYcNUwWTUFd&q=85&s=3a7edd7a49d219b2543c89d49c8392e0 280w, https://mintcdn.com/docs-dev-chore-events-autoupdate/TCxBOmYcNUwWTUFd/docs/images/cdy7uua7fh8z/1WBOicIOcH98hKj6Lq9HF2/4951e30a0cc08c7c5daa0116eaa17e11/Screenshot_2024-03-01_at_15.48.00.png?w=560&fit=max&auto=format&n=TCxBOmYcNUwWTUFd&q=85&s=660a4e89b22a19371f95d9c681a84e1d 560w, https://mintcdn.com/docs-dev-chore-events-autoupdate/TCxBOmYcNUwWTUFd/docs/images/cdy7uua7fh8z/1WBOicIOcH98hKj6Lq9HF2/4951e30a0cc08c7c5daa0116eaa17e11/Screenshot_2024-03-01_at_15.48.00.png?w=840&fit=max&auto=format&n=TCxBOmYcNUwWTUFd&q=85&s=941214eae4296d1323eab9e126a119cc 840w, https://mintcdn.com/docs-dev-chore-events-autoupdate/TCxBOmYcNUwWTUFd/docs/images/cdy7uua7fh8z/1WBOicIOcH98hKj6Lq9HF2/4951e30a0cc08c7c5daa0116eaa17e11/Screenshot_2024-03-01_at_15.48.00.png?w=1100&fit=max&auto=format&n=TCxBOmYcNUwWTUFd&q=85&s=bf601a4545b5872e45204662441095b5 1100w, https://mintcdn.com/docs-dev-chore-events-autoupdate/TCxBOmYcNUwWTUFd/docs/images/cdy7uua7fh8z/1WBOicIOcH98hKj6Lq9HF2/4951e30a0cc08c7c5daa0116eaa17e11/Screenshot_2024-03-01_at_15.48.00.png?w=1650&fit=max&auto=format&n=TCxBOmYcNUwWTUFd&q=85&s=bc44f720f82dabfcb8db598e4b8de1e9 1650w, https://mintcdn.com/docs-dev-chore-events-autoupdate/TCxBOmYcNUwWTUFd/docs/images/cdy7uua7fh8z/1WBOicIOcH98hKj6Lq9HF2/4951e30a0cc08c7c5daa0116eaa17e11/Screenshot_2024-03-01_at_15.48.00.png?w=2500&fit=max&auto=format&n=TCxBOmYcNUwWTUFd&q=85&s=7c6a27f400142f027860137a7fedb16a 2500w" />
   </Frame>
6. Sélectionnez **Apply**.

<h3 id="test-implementation">
  Tester la mise en œuvre
</h3>

Testez la mise en œuvre en suivant ces étapes :

* Inscrivez un nouvel utilisateur à une application.
* L’Action post-login dans le flux de Login affichera le formulaire et demandera ces renseignements.
* Sélectionnez **<Tooltip tip="Auth0 Dashboard : l’interface principale d’Auth0 pour configurer vos services." cta="Voir le glossaire" href="/docs/fr-ca/glossary?term=Auth0+Dashboard">Auth0 Dashboard</Tooltip> > User Management > Users,** repérez le nouvel utilisateur et vérifiez que ses attributs `full_name` et `job_title` contiennent les renseignements saisis à l’étape d’inscription supplémentaire.
